 In a recently published article that came out of Stanford University, I learned about new research that identified four causes of what the author describes as “Zoom fatigue” and ways to address them. Generally, the article suggests ways to address video call fatigue by minimizing or removing elements from the experience. These, in my opinion, are very practical and immediately beneficial moves for feeling a little bit better during long stretches of video calls. What I want to explore as an additional layer is an additive approach: add a digital whiteboard and use it as the primary “spontaneous” visual layer that video camera normally serves. With any research like this, and especially when considering school settings, it is important to consider all of the factors that may have contributed to what was observed and what has been suggested. What I appreciate about this particular publication is that it leaves breadcrumbs for thoughtful folks (educators, researchers, software developers) to follow and try to understand the phenomenon better as they try to manage, resolve, avoid, or whatever the approach might be for mitigating negative experiences. Here are the four elements they identified:
And here are those immediately practical steps one can take:
Here are four ways to use a digital whiteboard to help address video-conference fatigue based on the ideas of the referenced study:
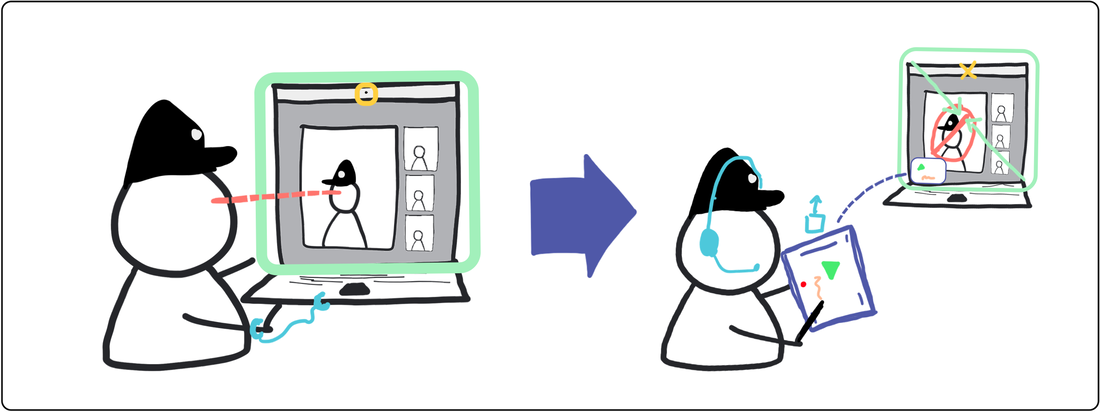
When you read the original article, you will find better descriptions of the suggested solutions for each element. Here, I want to suggest some ways it is possible to be additive (i.e. adding a whiteboard) in order to address the challenges rather than simply subtracting your own video. One question that should continue to be asked is whether getting together on a video call is even necessary / the best way to achieve the intended outcome for which meeting was chosen. With Explain Everything you can make asynchronous content (i.e. whiteboard videos) - a move that simply eliminates a video call from the discussion. Another question is to understand all of the possible dimensions that a live camera feed of you might be serving. Sure, participants can see your face and match your mouth to spoken words. But there is also simply activity, motion, movement, and spontaneity. These things on their own don’t necessarily translate into engagement, but compared to nothing being visualized OR static content (like a slide), it becomes easy to imagine why someone would think that live video feels more engaging (or worse, is simply better than the alternatives). And maybe a final question is whether folks are just simply fatigued from the stresses of a health crisis, social injustices, and other worldly problems. There are of course needs/reasons for getting together on a video call ( a class, a meeting, a presentation), so let’s find ways to make it an experience that is more considerate of self and others. Explain Everything was of course not created to explicitly address video call fatigue. But we have always considered the ways to better mediate communication, teaching, and learning across distance and time, and much of what we have already built and continue to build can help educators design for the elements described by this study. Below are some ideas for how. Challenge: Excessive close-up eye contact is not so great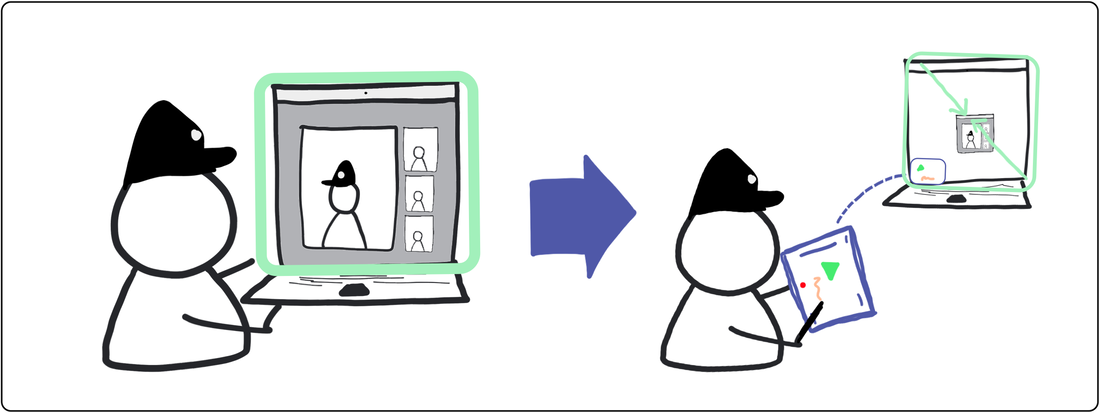 Idea: Share your whiteboard screen in your video call so it becomes the primary focus that immediately gives others a signal that they do not need to maintain excessive eye contact. You want to have engagement via video/visuals, but it does not have to be (nor should it be) just person to person, eye-to-eye constantly. This would be exhausting in person, yet it is a norm (or perhaps an expectation) when connecting over video chat to somehow demonstrate engagement based on where your eyes are pointing. Perhaps because other people cannot see what is in your environment, the default is that if you look away you must be looking at something else. If you were in person, and someone eye’s averted - you’d see what they are looking at - their notebook, a noise from the hallway outside the door, a classmate sneezing. As a presenter, imagine your live video on top of a screenshare of say a slide deck or other presentation. You almost have to rely on your video feed for movement, spontaneity, change in patterns, etc. to counterbalance the static nature of what might be shared. With Explain Everything, you can turn off your video when not needed, and use our whiteboard as your live, dynamic visual space. When you turn off your video, you can then give your students a implicit or explicit signal that it’s ok for them to operate the same way. Challenge: Seeing oneself constantly during video chats can be not so great 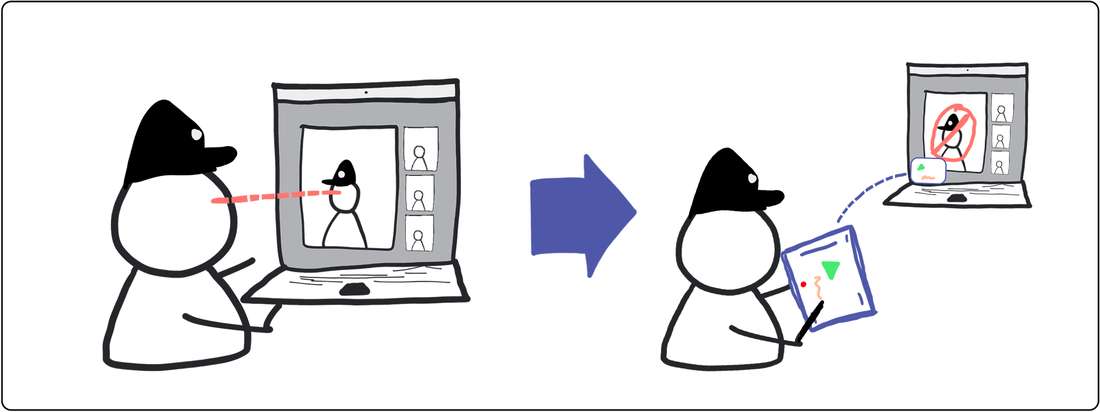 Idea: Hide your self view AND share your whiteboard screen so that you still give your participants permission to break eye contact, while you get relief from seeing yourself constantly. Substitute a whiteboard as the primary spontaneous visual space and keep your camera off (for yourself AND your audience) for only when you need it. I can think of a few fields (ballet/dance? Make-up & hair? magic?) where looking in a mirror constantly is requisite for performing one’s duties. This does not mean that a presenter’s camera needs to be off the entire time, but it certainly can be when visualizing ideas on a space like Explain Everything. Additionally, if you are like me, I my eyes will either be down on my tablet or across the screen on my browser when using a whiteboard, and my audience does not need to see the top of my head nor my slightly askew line of sight (i.e. not looking at them). Challenge: Ordinary mobility within a room/space is constrained - not so great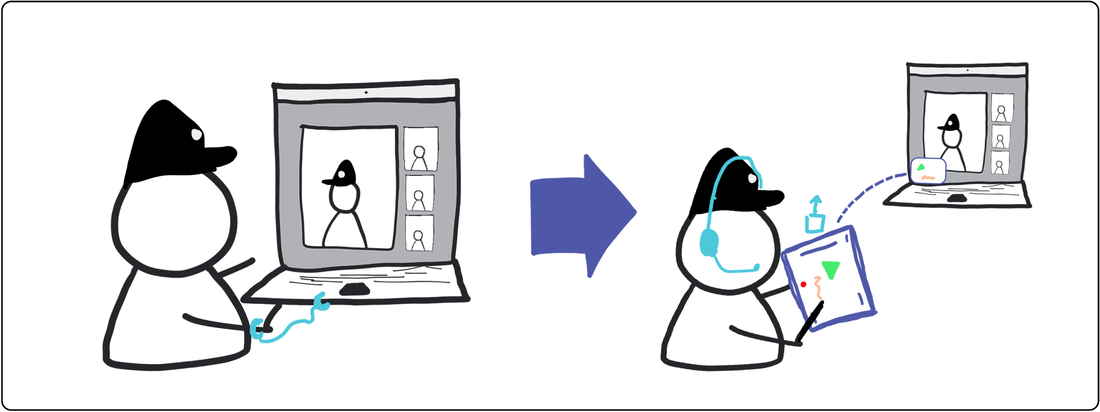 Idea: Turn off your camera AND share your whiteboard screen so that everyone still has a spontaneous visual layer that can help to make meaning of whatever is being shared or discussed. Use a mobile device (tablet is really nice for this) and a wireless head set to share your white board screen to the meeting while also maintaining your audio (mic and speakers) levels. When your camera is on, for most people in their home or standard teaching spaces, your body, eyes, and voice need to be situated such that you, your face, and your spoken words are proximate to the transmitting device (i.e. your laptop or desktop). Now, of course, some folks have nice cameras with auto-tracking, zooming etc, but that’s not most. Solving for mobility with audio is easier as the quality of wireless blue-tooth headsets is usually better than the onboard microphone and speakers of computers and tablets. Explain Everything was originally designed for mobile devices - iPads first and soon other tablets and phones. When not needing a camera, but working on a visual whiteboard space, with a phone or tablet it’s difficult to have a non-awkward camera angle, and generally if you are not looking at the audience there is no value in them seeing you. Imagine you are using your laptop or PC to start a video call, but when you want to start whiteboard, you can move to a more comfortable location or position. You can keep you audio consistent with a headset if you are moving further form the computer, or you don’t need to change anything at all if you are just getting into a more relaxed position for whiteboarding. Challenge: Higher cognitive (especially visual) load with navigating video, chat, shared screen, etc. - definitely not great Idea: Let’s assume that this increased cognitive load is non-beneficial for the learner. I know for me, I cannot look at my audience directly and whiteboard at the same time with equal, uncompromised attention to each of those visual channels. At the same time, I know my students cannot watch me and watch my whiteboard at the same time. By doing both at the same time, I am forcing them to constantly make a choice between what to pay attention to - my face and body language or my whiteboard. Now, in an in person setting this is also the case - however most of the other visual environmental variables are shared between speaker and audience. If you turn your eye/body away from the audience and toward a visual space, your audience will naturally follow you there. If a student turns away from you to look down to write some notes, you have more certainty about what might or might not be competing for cognitive bandwidth. When remote, in addition to shared visual elements (video, shared screen) there are infinite unknown visual variables in each participant’s environment that create even more of a cognitive challenge. Thoughtful selection of what is shared to an audience, video, whiteboard, video + whiteboard, will be appreciated by students, even if they are not able to initially articulate why it feels better. In ClosingI’m glad this article came out. More research/validation/settings are needed to further our collective understanding, of course, but what it does is give helpful framing and common descriptors for things most of us who are teaching learning, or working over video calls are experiencing. At the same time, it provides a generative pressure for companies like ours to continue to improve what we make so that it considers what is best for teachers and learners.
0 Comments
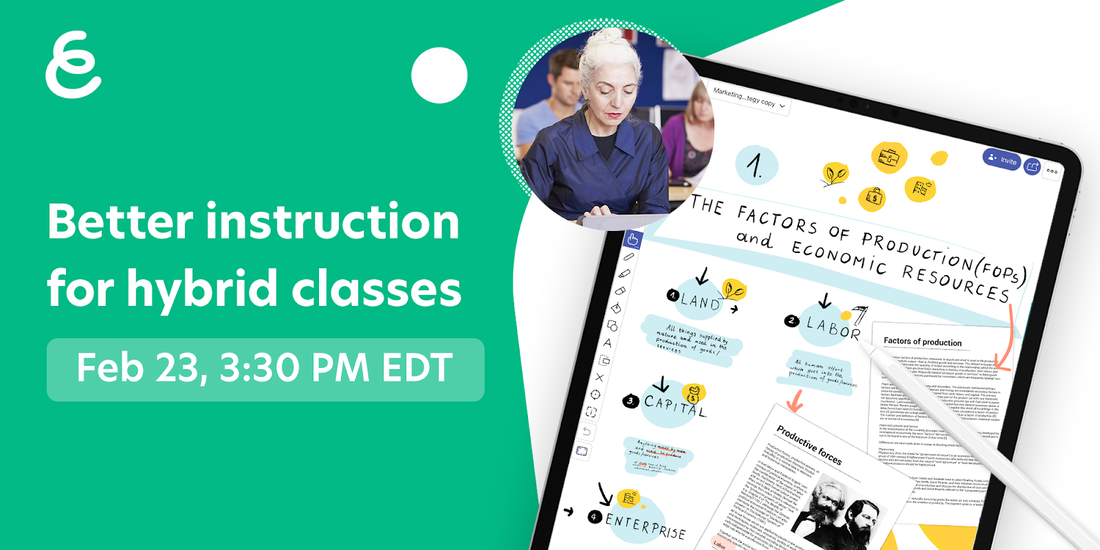 On February 23rd, I'll be sharing during a webinar on live instruction in remote & hybrid settings. With focused preparation, routine facilitation, and disciplined follow-up, teaching in these challenging modes can become easier, if note more enjoyable. You can learn more about this event here and register using the button below.
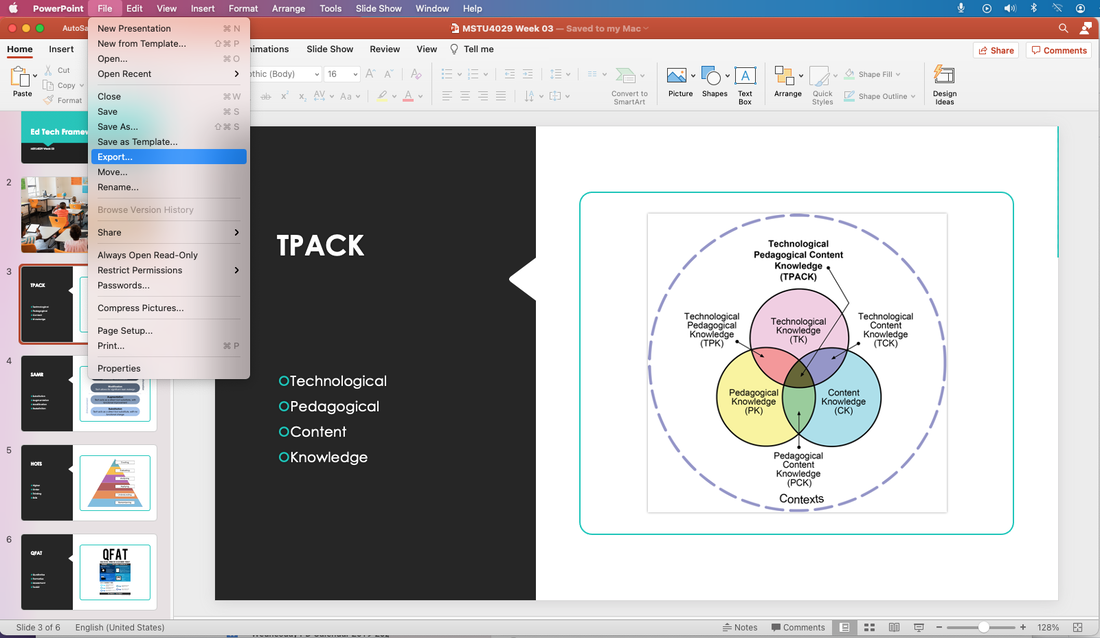
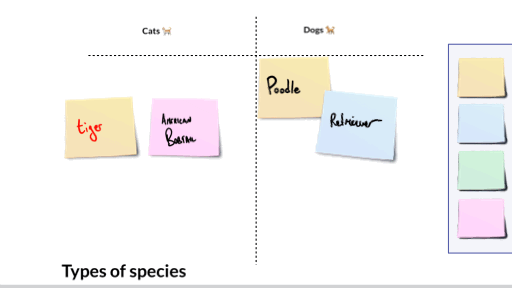 One type of collaborative work that is hard to do well across distance and time is to quickly capture a bunch of small ideas and then, in a shared space, arrange and rearrange those small ideas in a bigger frame. In person, this often happens with sticky notes and flip-chart paper. Online, folks are certainly turning to collaborative spaces to make this happen. I created a template for Explain Everything with 4 template slides and one instructional slide to make it easier for this to happen. One of the underlying design elements was to have people move away from the shared space while getting those small ideas down. Usually people do this at their seat and when ready get up and walk over to the shared space and place the sticky note. I created "idea spaces" on the slides so that people can do their ideating to the side, and bring them over to the main area. No one has to use this space, of course, but it might be helpful when facilitating a large group. 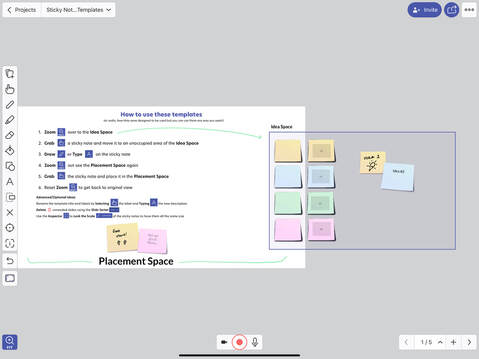 Below are overviews of the 5 slides in the template followed by links to download/access the template. Instructional Slide I find it helpful to have instructions at the point of need, and these might be useful when introducing a large group to the mechanics of the space. You can use this slide as a practice space before having folks dive into the real one. And you can also delete any unwanted slides, rename labels, and unlock any of the locked elements. T-Chart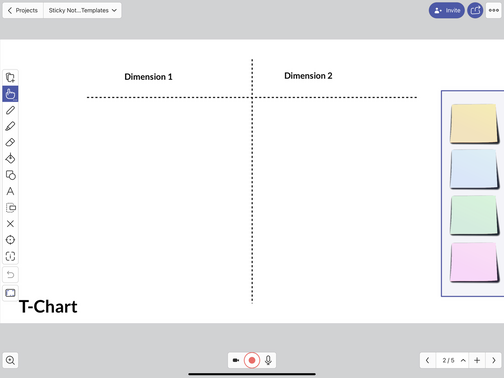 This is a simple two column chart that can be used for comparisons/contrasts, parallel focuses, in/out tables, and more. 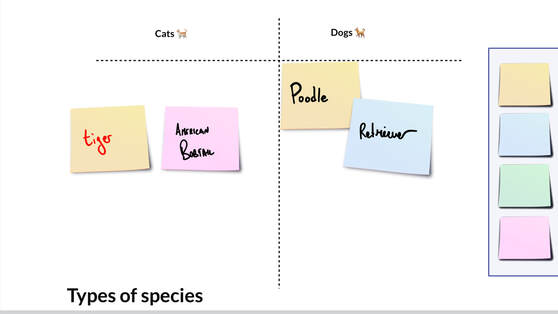 2x2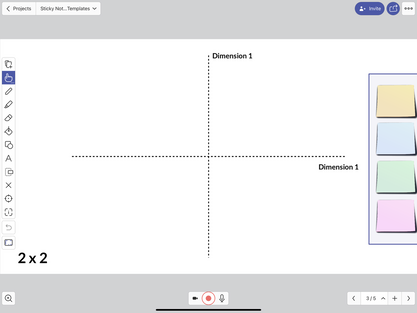 This 2x2 structure can be used for multi-dimensional decision making, SWOT analyses, polarity mapping, mood meters, and much more. 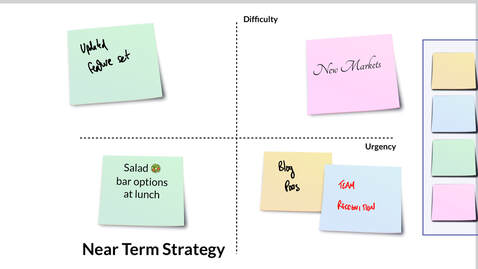 2-Variable This two variable chart is helpful for mapping things when one variable is independent (like age or time) and the other is dependent on it. This can be useful for journey mapping, social mapping, or any typer of exercise where it is interesting to understand changes over time or age. 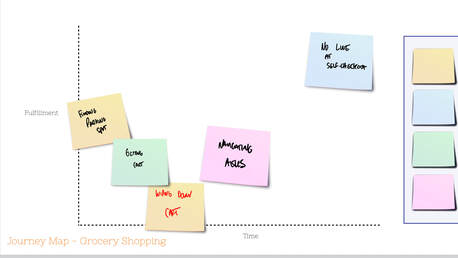 Freeform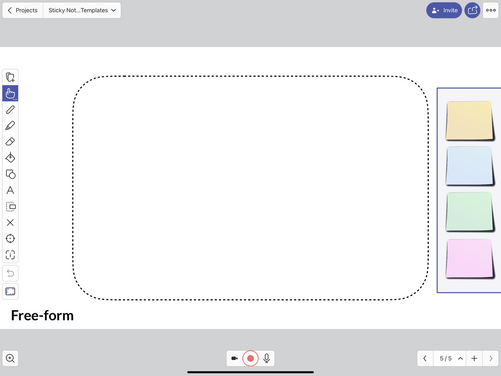 This is just an open ended space. You could even delete the background if it's not needed and then add your own headers and structures to the "placement area." 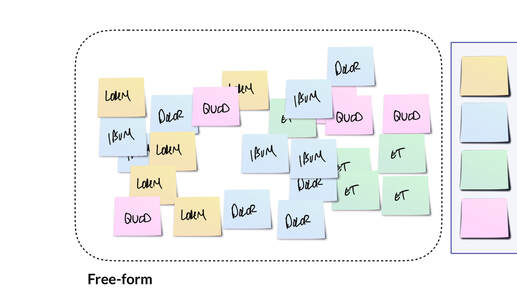 Download/Access Links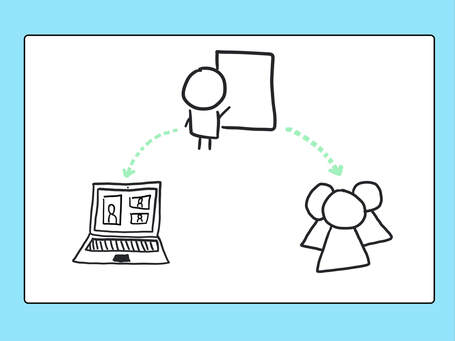 That is a long title for a blog post. At the same time, it is a very real situation in which many teachers are being asked to perform their professional duties even though it's incredibly difficult to simultaneously divide attention to two very different kinds of audiences with any degree of satisfaction. It may always feels like one kind of engagement method (in person or remote) is being served more effectively in a given moment than another. Direct instruction is just one of many ways to reach and teach students, whether its to frame a concept, to review procedures, or to go deep into storytelling to help students make meaning (I don't love the word "lecture"). It may never be possible to eliminate all of the challenges associated with this format, there are some logical, repeatable steps for facilitating direct instruction in a way that considers both audience types. The thinking below works for whatever video conference solution you might be using, whether it's Zoom, Meet, Teams, WebEx, or some other platform. Audience ExperienceThere are 3 key components to consider for your students' experience in any direct instruction setting. You want them to be able confidently weave in and around these channels as they individually take in and make sense of the information presented (orally and visually).
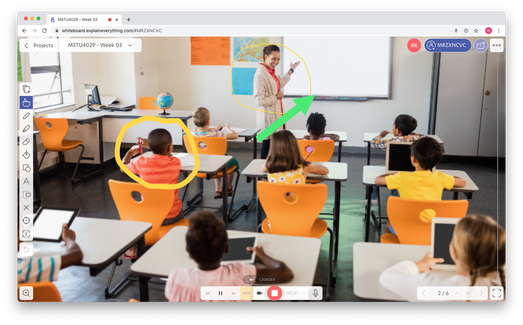
Seeing You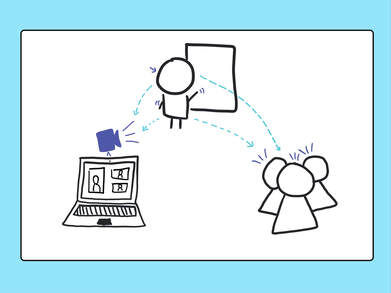 For in person students, this is a generally obvious dimension to manage. In your teaching space you can consider the sight-lines to the desks, tables, or other work areas and where you plan on being positioned. For remote students, this depends on camera placement. In some teaching settings, there is a camera fixed in the space. For others, the camera is more mobile (on a laptop, on a tablet, etc.). It can be helpful for a remote student to see the entire classroom, to see their peers, and the general environment in which the instruction is taking place. However, for direct instruction it is better to have the camera positioned more closely to the instructor so that facial expressions (even beneath a mask) and gestures can be better seen. The trade off is that the instructor may be more restricted in space unless you have a camera that automatically tracks and zooms and pans to 'stick' with the speaker (these exist, but carry a cost in money, implementation, and maintenance). Hearing You For in person students, this is a familiar dimension. In traditional classrooms, you calculate how to project your voice based on the proximity to students (often calibrated to those who are furthest away). In larger lecture halls or situations where students have certain auditory challenges, a microphone or other amplification device has probably already been in use. For remote students, this depends on microphone placement. In settings where an onboard laptop or tablet camera is being used, it usually means that accompanying integrated microphone is also being used. This requires the speaker to be in close and consistent proximity to the microphone in order to provide a steady listening experience for the audience. Ideally, you will create the option to separate the device that is sending live video (camera) from live audio (microphone). For example, if you have access to a secondary device (like a laptop, phone or tablet) you might join the meeting from that JUST to transmit audio, while using the primary device to transmit video. Seeing Your Visuals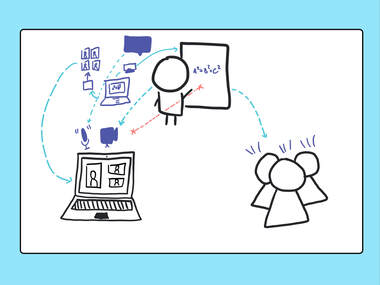 For in person students, they might have a good line of sight to a whiteboard, projector screen, or other kind of display within the teaching space. For remote students, it is possible to position the video camera so that it captures both you AND a whiteboard or screen. This is really hard to do well. The camera angle, the focus, and the video fidelity for most video conferencing solutions will not make it easy for students who are remote to see what is on the screen or board within the classroom. Ultimately it is better if you 1) use a digital whiteboard and/or 2) share your screen (i.e. presentation) through the meeting. This is best facilitated when your presentation device is separate from the device that is capturing the classroom video. You can join the meeting from your presentation device, share your screen to the meeting, and share your screen to the classroom projector/display. If you are presenting from an iPad and usually use Airplay to wireless project, you should join the meeting and share the screen to the meeting, but then project the other device (the one capturing the classroom video) to the classroom display. This is due to a current limitation in iPad only being able to share its screen to one destination at a time (either the Zoom OR Airplay). Instead of relying on a flip chart, whiteboard, or chalk board, using a digital whiteboard like Explain Everything can allow you to have that spontaneity and naturalness in your visualization of concepts. It's true that you lose some of the drama and theatrical effect of writing largely on the board, but at the same time, if positioned appropriately, you can find ways to not ever have your back to the students. I find that it is easier to sit and whiteboard (two free hands) as opposed to holding a laptop or tablet in one hand and then manipulating it with the other. Seeing and Hearing Your Students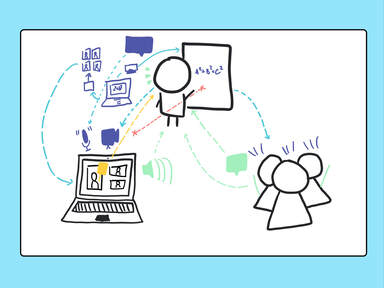 In person, it is easy to know when your students have a question. They may raise their hand. And you can often read from their body language if they are following, engaged, or disconnected. Even more so, they can sense and feel when you make eye contact and speak to them directly (even though you are actually speaking to the whole class). Simply put, if students are in the room with you the challenges of helping them be seen and be heard exist only in your own preferences and style of speaking.
For remote students, it's not always easy to see them, especially they are tiled in a gallery view and there are a lot of them. IF you do want to pause for questions or comments, you might ask students to put a thin, brightly colored piece of paper in front of their web camera to indicate a question. Or you might have them use the "Raise Hand" or "Q&A" or "Chat" to visually indicate that they have something to say, without introducing any audio interruption. For hearing your students, you might want to set a norm of having microphones muted until there are explicit pauses or moments for questions. From a technical perspective, you only want to have one microphone (audio in) and one set of speakers (audio out) within the space to avoid feedback (you've all probably heard that awful rising echoey screech before). Usually, this will be the same device (e.g., a laptop or tablet) but there are approaches that can work where separate devices are handling the audio in and out. For example, your camera device might also be the audio out device, but your microphone might be a phone or tablet that is closer to your speaking/teaching area. Like anything else, it takes a little experimentation within your space, with your style, and with the new routines you are willing to introduce to find a repeatable process but it is neither difficult nor inaccessible given the types of technologies we have today. In two previous posts, I shared about "quick and easy" whiteboard videos and "structured and optimized" whiteboard videos for higher education asynchronous instructional settings. Here, I'd like to share some moves to increase the production value for both the "quick and easy" approach as well as the "structured and optimized" approach. Here are the three areas that will be explored:
Workstation setup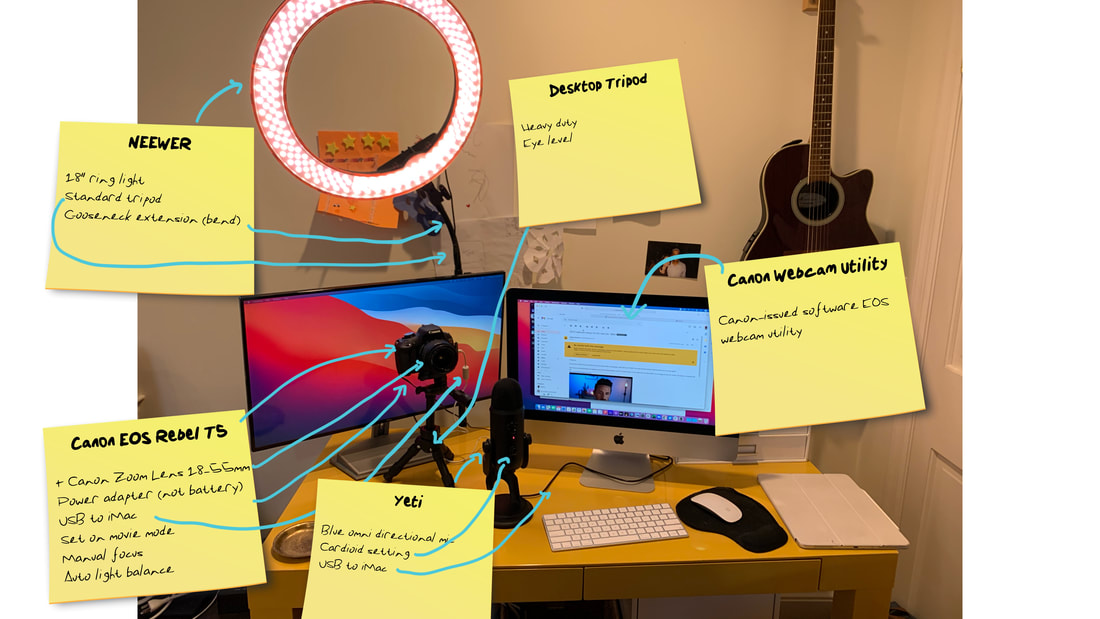 All of this gear might seem like way too much to want to deal with, but I am certain that small improvements in video and audio make a huge difference to audiences (live or via recording). I use Canon's EOS Webcam utility (PC or mac) to enable me to use a 3 year old SLR (Canon EOS Rebel T5 with a Canon Lens) as my webcam. I have it set to video mode, plugged in via USB to my computer, and plugged into a power source (my battery was not in great condition). It's sitting on a small desktop tripod. I also am using a Newer ring light (which was sent to me as a gift) on a regular tripod with a 'gooseneck' extension for the small bend. I am using a Yeti Blue USB microphone set to the 'Cardiod' setting. Here is what it's like before (desktop webcam, desktop microphone, no lighting). And here is what it looks like with the external camera and mic and lighting "Quick and Easy" Recording via ZoomIf I am making a quick and easy whiteboard video and I want to utilize my camera and microphone setup to the fullest, I'll do the following steps:
Here is what the linked video file would look like: Post-production with iMovieIf, as suggested in a previous post, you write out your script/talking points in full sentences, you can create two separate recordings. One will just be the whiteboard visual actions, and the other will be a 'talking head' video where you look at the camera and read from your script. In a video editing tool like iMovie, you can cut to and away from your main video as deemed effective. This requires of course both additional time for recording and editing (and some basic knowledge of timeline editing in a video editing tool). 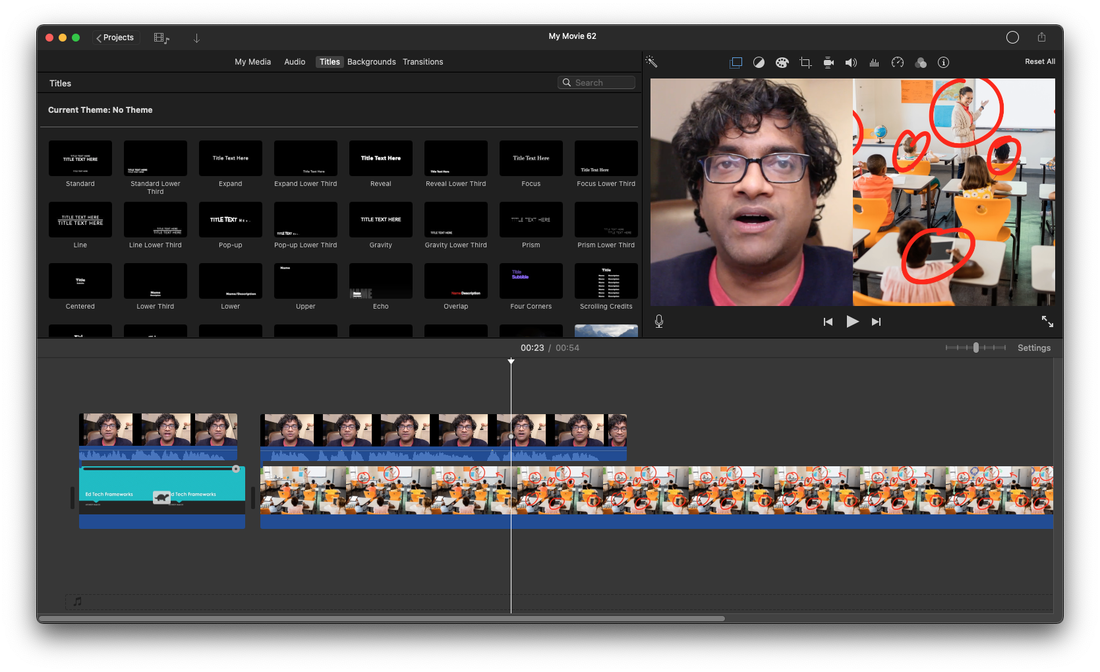 Below is a snippet of what the video output could look like. Free webinarJoin a free webinar on making videos for college and university instruction on Wednesday, 1/13 at 4PM ET.
In a previous post, I wrote about "quick & easy" steps for making whiteboard videos for college and university instruction using Explain Everything. Here are some additional steps that can provide more structure to the process and content while also optimizing the experience for your students. The areas to be discussed include:
Prepare a scriptI admit that I often like to ad lib and be spontaneous in my live instruction. And even with some of my whiteboard videos, I like to be informal and conversational. Sure, I will jot down some talking points on a post-it note or text file on my computer, but I don't necessarily always think about the precision of what might come out of my mouth. Often, however, when I listen back to what i have said there are way more pauses, "uhh"s, "um"s, and "you know"s than I think are helpful to the viewer/listener. Taking the additional time to write out a script accomplishes many things:
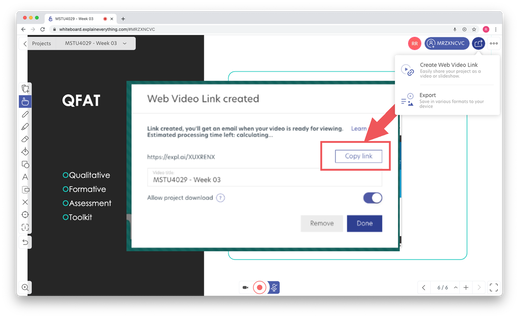
 Stage visual assetsI like to prepare slides in tools like Powerpoint and Keynote, but I do so in such a way that if I know that I'll be speaking to them (live or video), I won't try to jam all of the words and ideas onto the slide. Instead, I want what is visualized and what is spoken to be complimentary to each other. In addition to the backdrop slide, I like to prepare the things that I might want to add on to the stage as I am speaking. I could do this as staged builds within Powerpoint or Keynote, but I prefer to have some independence with the objects so I can move them around more naturally. I'll usually setup a folder that not only contains a PDF of my slides but also any additional artifacts (a PDF, an image, a Video, etc.) that I plan to add and make sure it is in a place I can access from Explain Everything (desktop folder, GDrive, Dropbox, etc.).  Record audio then visualsFirst, I'll create a project and import my backdrop slides as separate pages in Explain Everything. Then, using my script, I'll record the audio for each slide without worrying about any visuals or animations. I can really focus on my words and pacing. Next, I'll rewind and MUTE my microphone. This is where the Mix mode of Explain Everything becomes really powerful. I can add visualizations while listening to myself speak. I can also pause, add something to the canvas, and then resume recording visuals. This will make it seem like things are instantly appearing to the viewer. I'll add objects and annotations to each of the slides of my recording after first recording my talk track. There are a lot of timeline editing options, such as removing dead/quiet space at the start or end of a video that you can learn more about at Explain Everything's Help Center.  Export and publish videos in chunksIt is possible to quickly generate a shareable URL that will show all of your recorded slides in a single, stitched together video. However, it can be very helpful to your viewers to separate longer videos into chunks. It requires a few additional clicks on your part, but reduces the effort for all of your students (however many there may be). 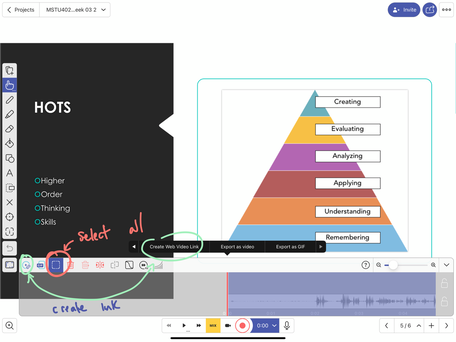 First, open up the timeline and rewind to the beginning. Then, press the Select area button and scrub to choose the entire timeline. Finally, choose the 'Web Video Link' button. It will generate a unique URL for just the video content of the selected area. This is the URL you can copy and paste to your Learning Management System. If your video has 5 sections, you'll have 5 URLS (here is where naming can be helpful). 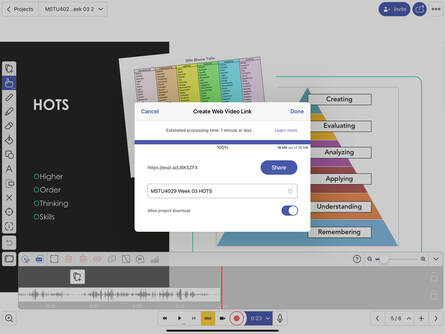 Below is what it looks like in my Canvas course page editor just before I'm ready to hit save, and this link will take you to the entire video stitched together. 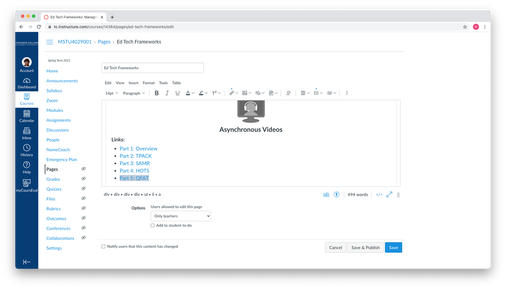 Free WebinarI'll be hosting a free webinar on this topic on Wednesday 1/13 at 4PM ET. Sign up below!
Here is a quick way to create a whiteboard instructional video using Explain Everything and content you already have for your college or university course. We'll go through three phases: Prepare, Produce, and Publish.
Prepare
First, I always like to write on a piece of scratch paper or a note pad the talking points I want to cover and then imagine how those might be staged across slides/views.
Then, using my preferred tool I will review/create/update my visual backdrop according to those notes. I will export/save the file in a place that I can readily access. Here I am using Microsoft's Powerpoint and am exporting the file as PDF to my desktop as PDFs preserve formatting best and talk more nicely to other applications. If you normally use staged builds and transitions in your presentations, you will need to think about what is important or how to export the builds so they show up as different PDF pages
Produce
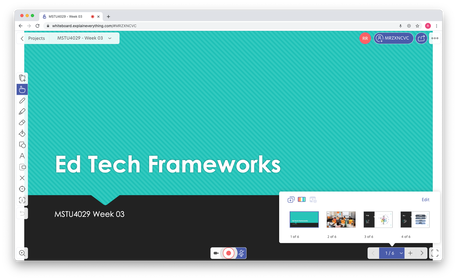
First, I will create new project and import my PDF. I might quickly set up my colors and desired pen thicknesses. Then I press record and using my notes speak to each slide on by one. Here I am using the web version of Explain Everything.
Publish
When I am done recording, I select the Create Web Video option from the share menu and copy the link.
Finally, I head to my Learning Management System and find the page where I want my students to access the video. This is where I will paste the link. Here I am using Canvas' LMS.

The Outcome
Here is the video that resulted.
Free Webinar Weds 1/13 4:00PM ET
I'll be hosting a free webinar on Whiteboard Videos for Higher Ed Instruction on Wednesday, January 13 at 4PM ET. In addition to "Quick and Easy" creation, we'll also explore more structured and optimized videos as well as higher production options.
 It can be a worthwhile exercise to put some time and consideration into how information will flow across the platforms and devices that students might be accessing for your college or university course. It will be essentially impossible to expect all students to have the same conditions (hardware, notification setups, etc.) but it is possible to describe the primary information flow as designed so that students can adjust as best as possible. Step 1: Identify the platforms used for Course Content, Text-Based Dialogue, and Video/Voice dialogue Step 2: Consider the types of information and experiences used in each of those platforms Step 3: Define the designed modes of accessing and contributing to each of those platforms for students Step 4: Acknowledge all of the additional possible layers and interconnections between those modes and systems. If you want to experiment with this exercise, here are some links that may help:
These are the instructions I am sending to students for my Spring 2021 course (via an LMS announcement):
Below are the screens of what students would see.
To get this all setup in advance, here is a whiteboard video showing what I needed to do as an instructor both in Explain Everything and in my learning management system (Canvas).
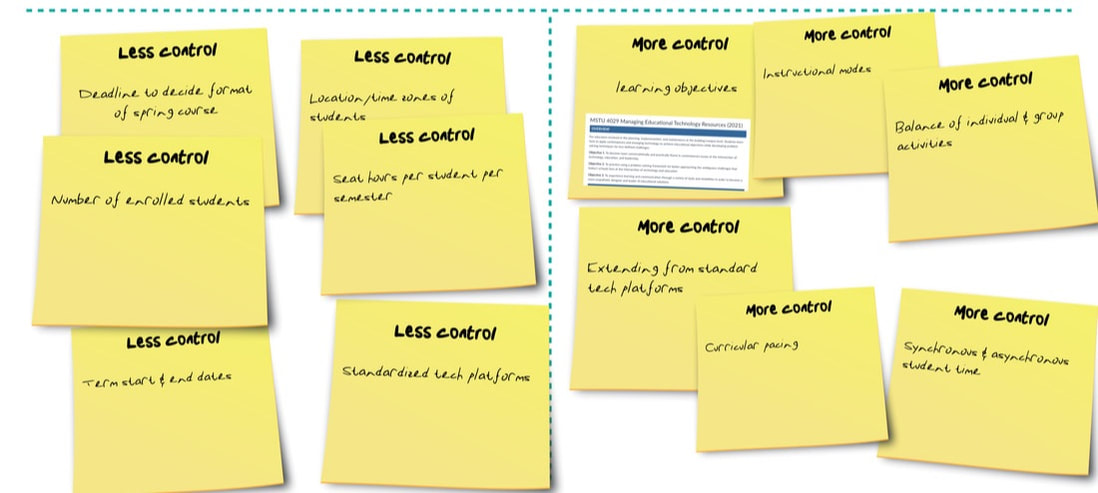 This exercise may help teams plan when experiencing a loss of control (perceived or real). For every element where less control is felt, try to identify a paired element of more control that exists within it. In the video below, jump to 6:58 to see a model use of this instrument. Control Mapping Templates
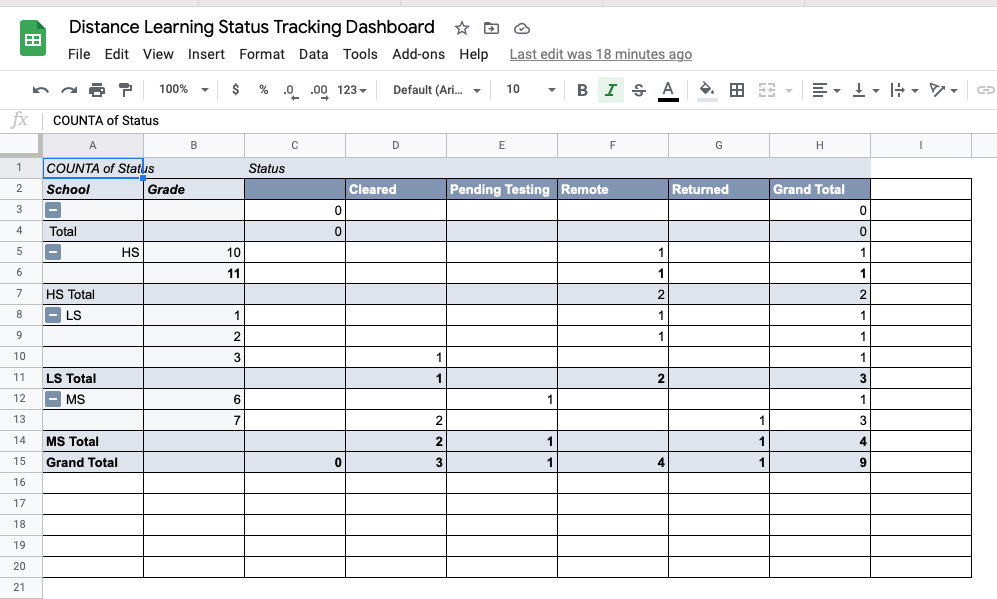 I've been using a (secured) Google Sheet to keep track of data about students who are out of school and require short term or longer-term distance accommodations that are outside of the primary/default current mode. Most schools (should) have a student information system and/or attendance tracking system that may be capable of recording such information, and those should be continue to serve as the official 'system(s) of record'. However, these systems also may not have the kind of reports and views to provide more timely insights for those who may need information in order to make better informed decisions. As we're at a midpoint in the school year (in the US at least) it is a good time to review and better understand the patterns and trends related to emergency accommodations (i.e. distance learning) that there simply may not be the bandwidth for while deep in the middle of what is essentially prolonged crisis response. This link should take you to an option to make a copy of a Google Sheet which I have setup. Here are some thoughts that may help you use it better. Someone (or a small team) needs to 'own' this and the process by which data is entered and reviewed against other systems. Don't input all data if you don't have toI've added a bunch of columns, but you do not need to track all of the data if there is already a good system in place for it and/or you don't necessarily think it will be important (for example, you may not need to list a student's name or the teacher names or parent contact etc.). Right click on any column to delete it. The most important columns to use are probably:
Use/add tabsThe first tab is the 'raw' data. The second and third contain pre-set pivot tables that will automatically update as you enter more raw data. You can duplicate either of the pivot table tabs and mess around with the view choices (rows, columns, and values) Set up data validation drop-down lists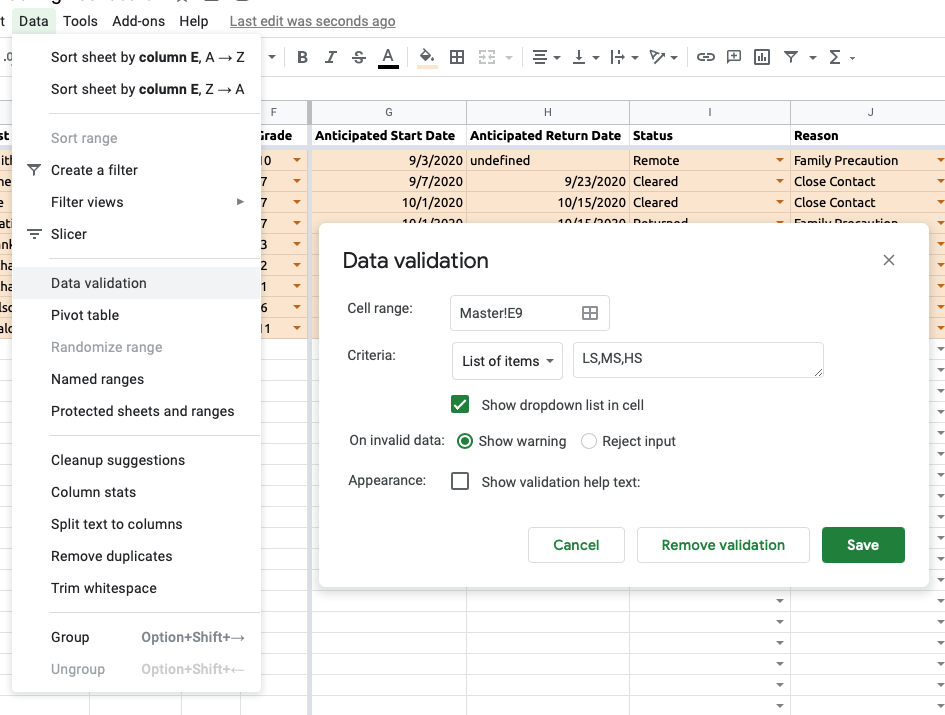 To make data entry easier, set up certain fields with pre-set lists of choices (select cell -> Data -> Data Validation -> List of Items) I suggest using this for the school/division, grade, status, and reason fields. Consistency in these areas will make the pivot tables less prone to error. Once you have one cell set up, you can highlight other cells in the column and do Edit -> Paste Special -> Paste Data Validation only. This will add the drop down criteria to the selected cells without replacing what's already in there. This is super helpful if you decide to add or change the drop-down lists over time. 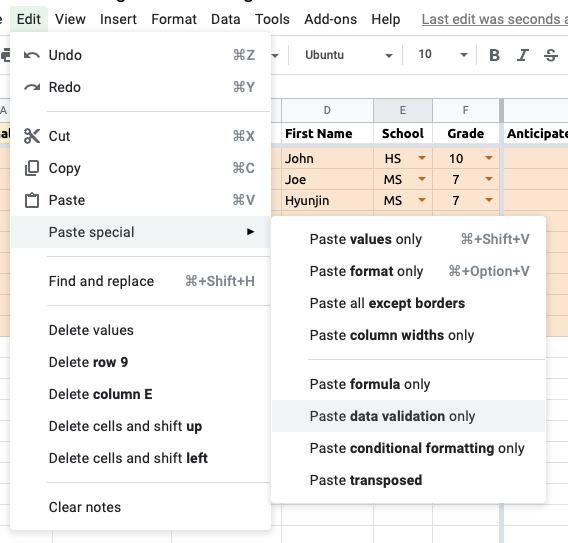 Use filters instead of sort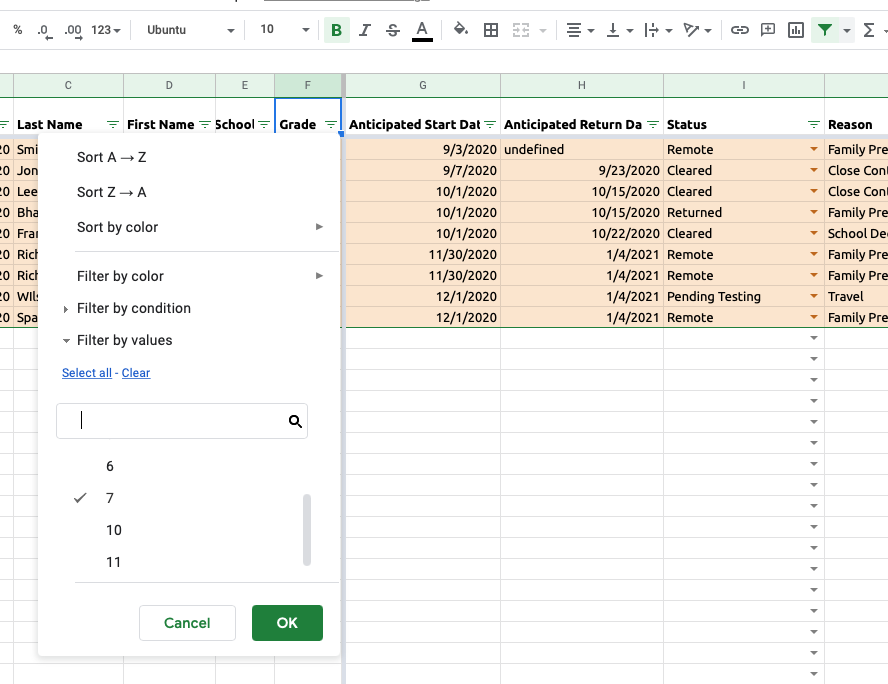 You can use Filters on the 'Master' tab to quickly see all of the rows that contain a certain field (for example, all students in grade 7). This is better than constantly sorting and re-sorting the data (though this works too).
With filters, you can also utilize data in custom columns for tracking things that you may not need in a pivot table (for example, I sometimes track families I may need to follow up with in the first column). Here is a note that was sent to all faculty in my department at Teachers College, Columbia University just before Thanksgiving (US holiday). 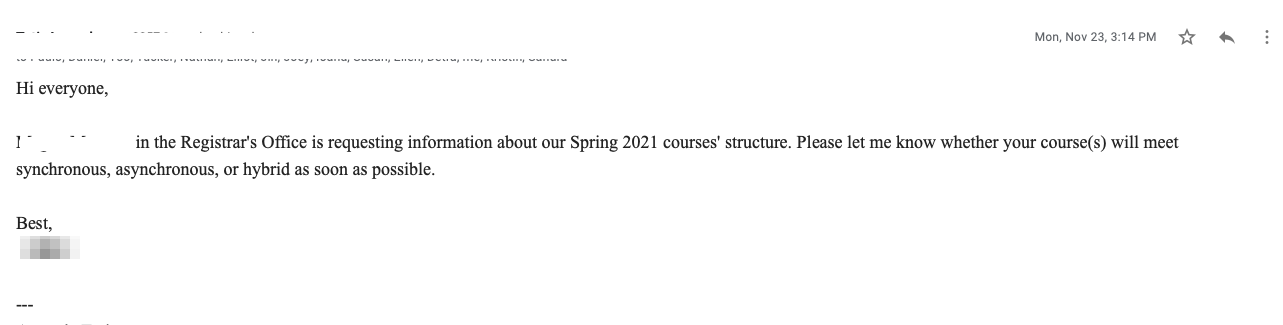 Not knowing exactly how things would be in our region (NYC-area) and how exactly we'd need to update our usual Spring semester course, Don Buckley and I had to make a quick decision based on limited information. The urgency was defined by Spring registration for students starting on December 7th and our course historically being enrolled to capacity every year on the first morning of registration (it's capped at 23 students). We chose "hybrid" for MSTU4029: Managing Educational Technology Resources, understanding and having confirmed that hybrid was being defined as a mix of synchronous and asynchronous instruction (all remote, nothing in person). A helpful planning exercise for a situation like this is to identify all of the things that are less in your control and that are more in your control. Below is what we identified, finding an opportunity within each constraint:
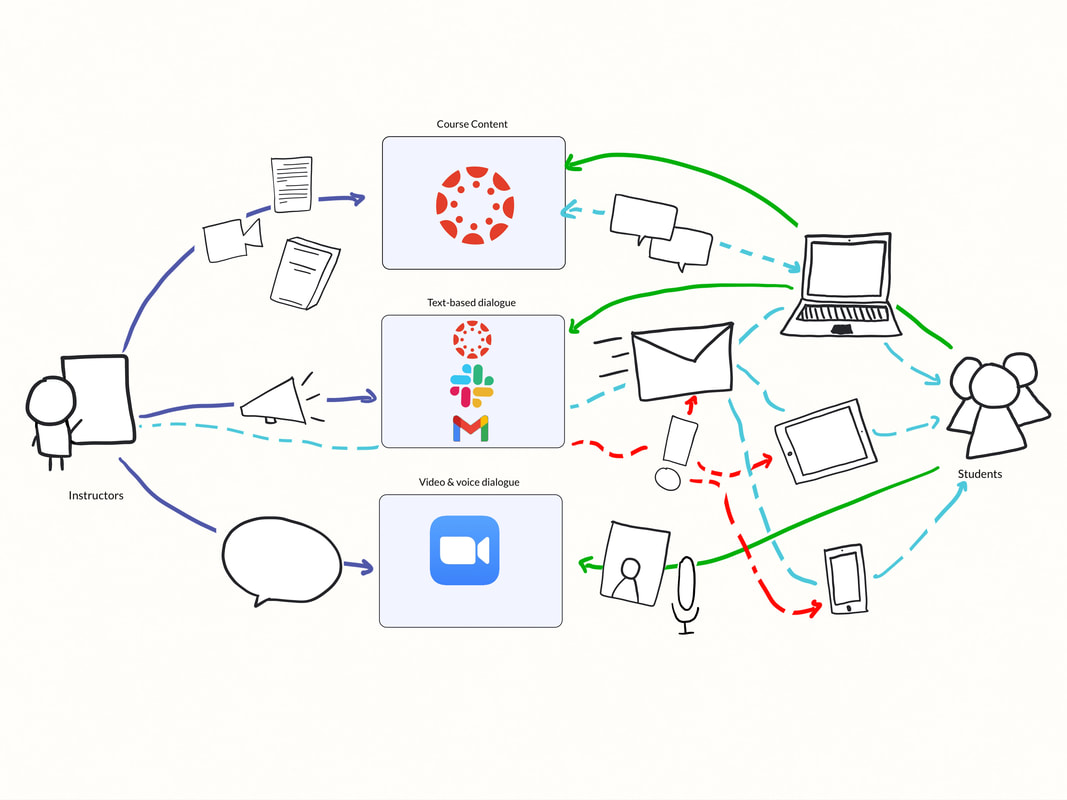
Announcement Deadline / Learning ObjectivesLess Control: November 23rd is when we were informed about needing to make a decision; we assumed it needed to be decided prior to Spring term registration on December 7th. More Control: We knew that regardless of the course mode designation, our learning objectives for our students should not materially change. We chose the path of 'hybrid' without fully having fleshed out our Spring term plan based on this format because we knew we could use our objectives as the guideposts for all of our ongoing planning and adjustments. We can also define how progress towards those objectives will be assessed. 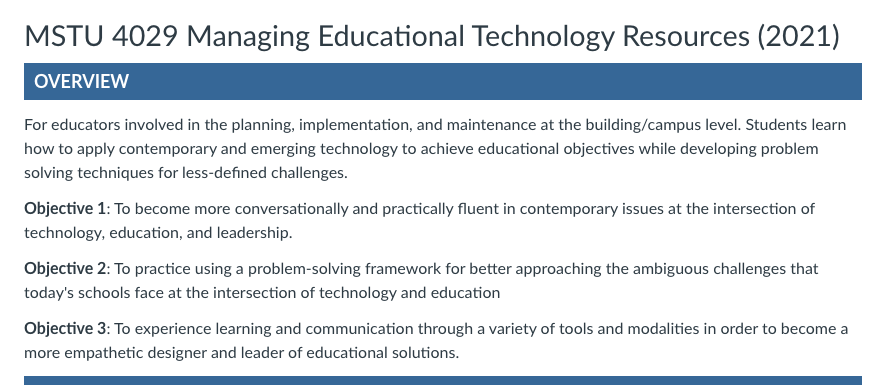 Number of Students / Individual-Group Work BalanceLess Control: This course is has an enrollment cap of 23 students, though we have usually allowed 1 or 2 more students to enroll with special exemptions or simply as auditors. This numbers been defined both by the physical room size we prefer to be in, but also due to the types of group activities we wants our students to do and to be able to meaningfully share about. We have found that more than 5 groups sharing their work can lead to 'sharing fatigue' More Control: Knowing that we'd keep to this enrollment cap and assuming that we'd be fully enrolled has made it a little easier to plan. One of the benefits of being in an in-person setting is the opportunity to be physically close to your peers and develop certain interpersonal skills that benefit from being proximate. When we have 25 people in front of us, we want there to be a reason that we're all together. If it was 2 hours of just Don and I lecturing at the students each week, it would be very fair for students to question why we are gathering at all. We want to have similar social, small group opportunities that we have had in person, but they require set up and planning that may not always yield the best result. 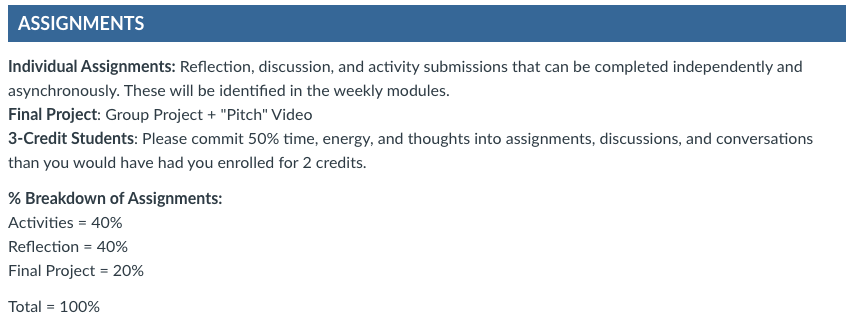 Semester Dates / PacingLess Control: The Spring 2021 semester starts on Monday, January 11th and concludes on Monday, April 26th. The start and end dates are earlier than usual, most likely because the university may be planning on a longer-than-usual summer semester. More Control: Normally, this is a face-to-face, in person class that runs on Tuesday evenings from 5:10-6:50pm for 15 weeks in a row, one of those weeks being a no-class week for Spring Recess. While the start and end dates are fixed, we do have some choice for how we structure the time in between. Knowing that at least once a week there will be a time that all students can get together (or small groups can get together) provides a lot of flexibility and choice for how experiences will designed. What we decided to do is have first two weeks be synchronous in order to establish norms and define expectations while also supporting students' onboarding and community building. That is followed by a few weeks of asynchronous instruction that has typically in the semester been quite content/reading heavy and does not necessarily require a live lecture. We have also planned two weeks where we might meet twice within the week on two consecutive weeks (so 4 x meeting in two weeks) in order to develop some momentum for a particular portion of our course (problem solving with design). 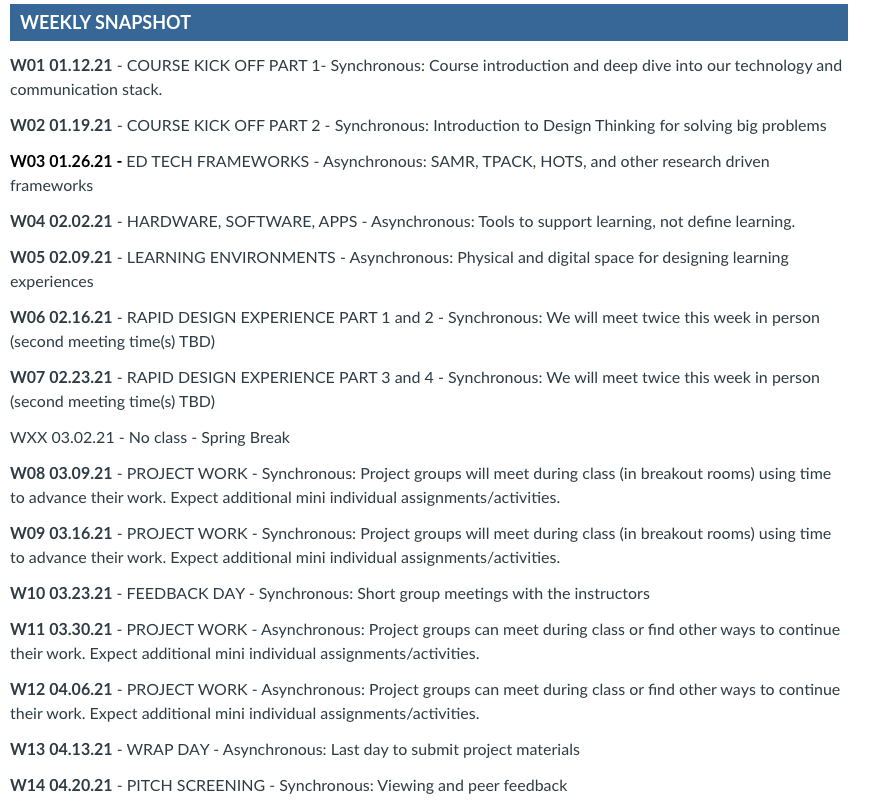 Seat Hours / Synchronous vs. AsynchronousLess Control: Somewhere in a faculty handbook is the definition of expected "seat hours" per course (or credit) in order to meet certain academic excellence standards. It's probably in the realm of 23-24 hours of class time plus another 15-30 hours of in-between work (readings, assignments, etc.). More Control: Utilizing both synchronous and asynchronous instructional modes, we can continue to meet this criteria without it being defined by traditional seat time. Location / Instructional ModesLess Control: Usually, we expect all of our students to be in the same time zone as us (NYC - Eastern Time) as they are expected to be attending our class in person. Since both Don and I are on the east coast and have other commitments, we do need to generally operate with a schedule that works for us. However, we also understand that there are students who may not be able to have a convenient time zone alignment (e.g. anywhere in Asia). More Control: For synchronous instruction, we plan on a mix of mini-lessons, digitally 'hands-on' whole class activities (using collaborative spaces like Mural, Google Docs, Padlet, Explain Everything, etc.), and small group break-outs. For asynchronous instruction, we also plan recorded mini-lessons, readings, and small group and pair activities. It's all about balance, a balance which is not definable without having gotten to know your students even just a little bit. We will some of use our scheduled class time for synchronous small group meetings (i.e. our final project) as it is often hard for groups students to find convenient times to meet outside of class, especially when time zones come into play. Standard Tech / Add-on TechLess Control: There are only a few platforms that we know the all of our students use. The two most important ones are our Learning Management System (Canvas) and our Email system (G Suite). Now, G Suite provides access to a ton of other tools that we do use regularly (Docs, Slides, Sheets, Maps, etc.) but when it comes to regular communication its just those two: the LMS for course content and announcements; Email for notifications and individual communication (though sometimes mediated by Canvas's messaging module). More Control: We do not want to introduce routines and habits that will confuse students who may be taking anywhere from 1-3 other courses this semester. Instead, we look to defining how we will use other platforms in conjunction with the above mentioned default systems. The image below highlights what we'll be using and for what primary purpose(s). 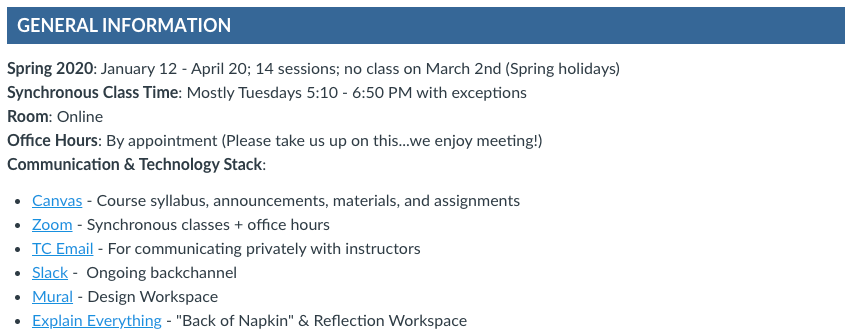 It's impossible to be totally comprehensive and all-encompassing in a blog post. The intent here is to make visible the thinking behind our process given the constraints and opportunities that we happen to have.
I'll be facilitating a free webinar on Wednesday, December 30th at 4PM ET to talk through all of these elements and respond to any live participant's inquiries. The webinar will be recorded and available on demand as well.  For the first half of the 2021 calendar, I will be dedicating most of my sharing efforts towards helping instructors in higher education settings (full time professors, lecturers, adjuncts, teaching/graduate assistants, etc.) better approach the challenges for distance and hybrid learning in colleges and universities during the upcoming term. My long-time co-instructor Don Buckley and I will be redesigning and facilitating our usual Spring semester course at Teachers College, Columbia University: MSTU4029: Managing Educational Technology Resources. So I figured might as well share what we are navigating through - challenges and opportunities - while we're deep in the work ourselves. In addition instructional design, we're very focused on communication design and how we'll be using our Learning Management System , a video conference platform, a chat platform, email, collaborative spaces, and presentation tools. What we do should not necessarily depend on which tool is being used, though for those interested here is what we are using:
In addition to sharing thoughts via this blog, I will be hosting a bunch of free, brief webinars (can watch live or on demand) on the topics listed below in partnership with Explain Everything. Soon there will be a schedule page (once a schedule has been decided). The first one will be on Wednesday, December 30, 2020 at 4PM ET. Course design: Adapt an in-person course for distance learningWednesday, December 30, 2020 at 4PM ET. Learn about how a Teachers College, Columbia University graduate school course that is normally designed for an in person setting is being adjusted and adapted for distance learning. Walk away with ideas for approaching the scheduling and meeting constraints and opportunities that you may be navigating next term. Future TopicsCourse design: Adapt an in-person course for distance learning (12/30/2020 4PM ET)
Learn about how a Teachers College, Columbia University graduate school course that is normally designed for an in person setting is being adjusted and adapted for distance learning. REGISTER Pre-course prep: Take care of the little things so you and your students have a better experience Learn about two important steps for using Explain Everything with your college and university students: 1) setting up a group account 2) adding/linking Explain Everything to your learning management system (LMS). Canvas will be the LMS modeled in the webinar. Communicating across distance: Better understand how all of the tools and platforns can fit together Learn how to better aritculate your entire communication and technology "Stack" and most effectively use various platforms for what they are best at from learning management systems to video conferencing tools to chat platforms to email and to collaborative workspaces. Tools to be specifically discussed include: Canvas, GSuite, Zoom, Slack, Mural, Explain Everything. Whiteboard video lecture 1: Create video content quickly and easily for your students Learn how to design a whiteboard video lecture with Explain Everythng and share it with students via your learning management system (LMS). This will include drawing on a blank canvas and utilizing existing content (slides, documents, images, videos, etc.). Canvas will be the LMS modeled in the webinar. Whiteboard video lecture 2: Break longer segments into bite-sized chunks Learn ways to prepare a whiteboard video lecture in smaller chunks with Explain Everything and organizing the content on your learning management system (LMS). Canvas will be the LMS modeled in the webinar. Live facilitation 1: Present and annotate upon existing materials Learn how to use your existing materials (slide decks, documents, images, and videos) and Explain Everything as your presentation and annotation tool when teaching across distance with video conferencing platforms. We'll model this exercise using Zoom as the video conference solution. Live facilitation 2: Present and annotate on a blank canvas Learn ways to use Explain Everything as a blank canvas during video conferences in the same way you might a dry erase board, flip chart, or chalk board in a physical setting. We'll model this exercise using Zoom as the video conference solution. Engaging learners 1: Invite students to the board during live classes Learn how to "invite students to the board" by creating and facilitating interactive experiences during live class sessions using Explain Everything and your video conferencing platform. We'll model this exercise using Zoom as the video conference solution. Engaging learners 2: Utilize breakout rooms for smaller group discussions and activities Learn how to create and facilitate engaging breakout room moments during live classes with Explain Everything and your video conferincing platform (even if it does not support Breakout rooms itself). We'll model this exercise using Zoom as the video conference solution. Individual student tasks: Have students work on and submit assignments with a whiteboard. Learn how to create, post, and collect individual student assignments using Explain Everything and your learning management system (LMS). Canvas will be the LMS modeled in the webinar. Collaborative student tasks: Have students work together on and submit problem sets & projects Learn how to create and post collaborative problem sets and other multi-day group projects using Explain Everything and your learning management system (LMS). Canvas will be the LMS modeled in the webinar. Student reflection: Ask students to reflect upon their work and learning as a whiteboard video Learn how to create, post, and collect individual student reflections using Explain Everything and your learning management system (LMS). Canvas will be the LMS modeled in the webinar. Peer feedback: Engage students in critical, generative dialogue with their classmates Learn how to setup activities where students provide multiple rounds of audio and visual feedback to their peers using Explain Everything. Instructor feedback: Create personal, conversational feedback moments for students Learn how to provide personalized feedback to students in ways that honor, but do not replicate, the value of informal feedback which so osften occurs when in person. Whiteboard video lecture 3: Higher production videos Learn how to use whiteboard video content made with Explain Everything with other video making sources (e.g. phone Camera, Zoom) and editing tools (e.g., iMovie, Premiere Elements). Live facilitation 3: Higher production presentation Learn how to optimizing your home or office setup for teaching across distance and utilize the deeper settings of your tools of choice (e.g., Zoom, Powerpoint, Keynote, etc.) for a higher production feel to your live lessions. |
 RSS Feed
