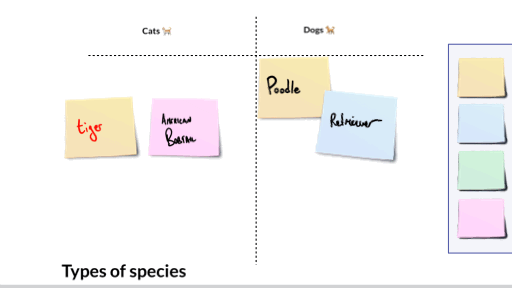
 One type of collaborative work that is hard to do well across distance and time is to quickly capture a bunch of small ideas and then, in a shared space, arrange and rearrange those small ideas in a bigger frame. In person, this often happens with sticky notes and flip-chart paper. Online, folks are certainly turning to collaborative spaces to make this happen. I created a template for Explain Everything with 4 template slides and one instructional slide to make it easier for this to happen. One of the underlying design elements was to have people move away from the shared space while getting those small ideas down. Usually people do this at their seat and when ready get up and walk over to the shared space and place the sticky note. I created "idea spaces" on the slides so that people can do their ideating to the side, and bring them over to the main area. No one has to use this space, of course, but it might be helpful when facilitating a large group. 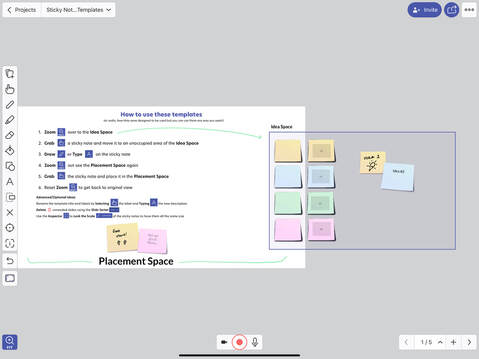 Below are overviews of the 5 slides in the template followed by links to download/access the template. Instructional Slide I find it helpful to have instructions at the point of need, and these might be useful when introducing a large group to the mechanics of the space. You can use this slide as a practice space before having folks dive into the real one. And you can also delete any unwanted slides, rename labels, and unlock any of the locked elements. T-Chart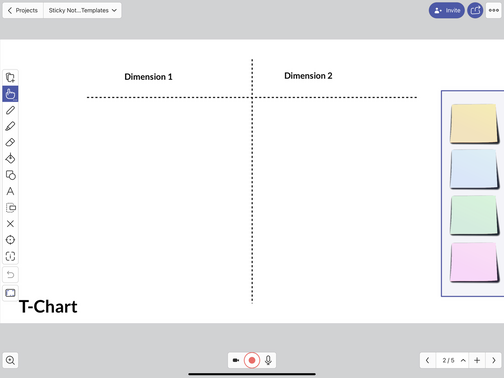 This is a simple two column chart that can be used for comparisons/contrasts, parallel focuses, in/out tables, and more. 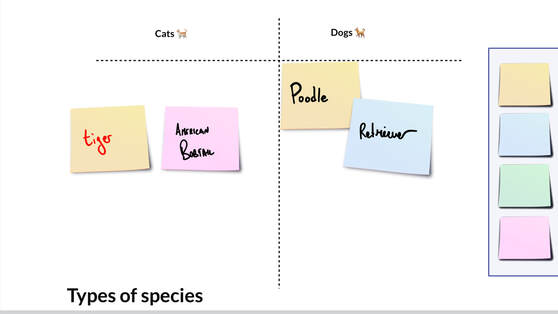 2x2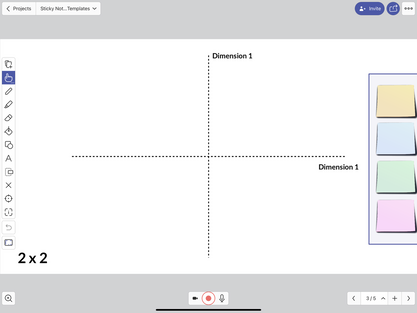 This 2x2 structure can be used for multi-dimensional decision making, SWOT analyses, polarity mapping, mood meters, and much more. 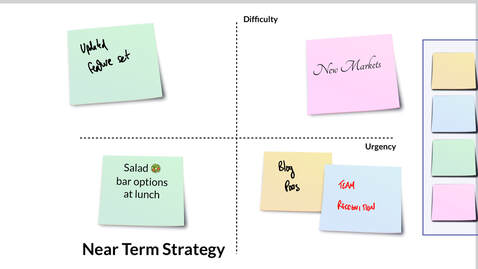 2-Variable This two variable chart is helpful for mapping things when one variable is independent (like age or time) and the other is dependent on it. This can be useful for journey mapping, social mapping, or any typer of exercise where it is interesting to understand changes over time or age. 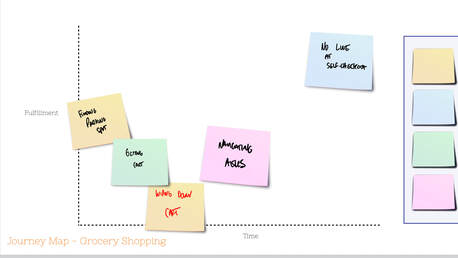 Freeform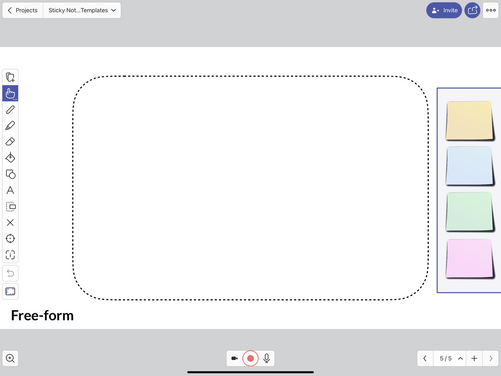 This is just an open ended space. You could even delete the background if it's not needed and then add your own headers and structures to the "placement area." 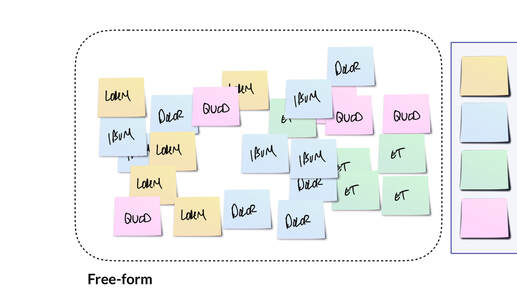 Download/Access Links
0 Comments
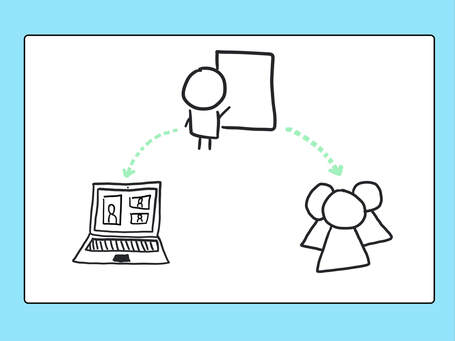 That is a long title for a blog post. At the same time, it is a very real situation in which many teachers are being asked to perform their professional duties even though it's incredibly difficult to simultaneously divide attention to two very different kinds of audiences with any degree of satisfaction. It may always feels like one kind of engagement method (in person or remote) is being served more effectively in a given moment than another. Direct instruction is just one of many ways to reach and teach students, whether its to frame a concept, to review procedures, or to go deep into storytelling to help students make meaning (I don't love the word "lecture"). It may never be possible to eliminate all of the challenges associated with this format, there are some logical, repeatable steps for facilitating direct instruction in a way that considers both audience types. The thinking below works for whatever video conference solution you might be using, whether it's Zoom, Meet, Teams, WebEx, or some other platform. Audience ExperienceThere are 3 key components to consider for your students' experience in any direct instruction setting. You want them to be able confidently weave in and around these channels as they individually take in and make sense of the information presented (orally and visually).
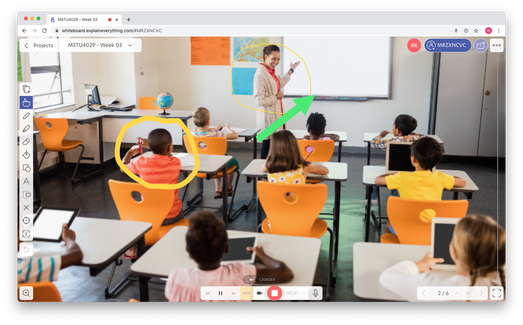
Seeing You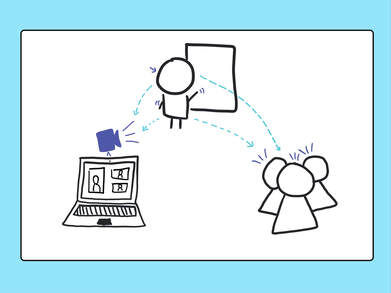 For in person students, this is a generally obvious dimension to manage. In your teaching space you can consider the sight-lines to the desks, tables, or other work areas and where you plan on being positioned. For remote students, this depends on camera placement. In some teaching settings, there is a camera fixed in the space. For others, the camera is more mobile (on a laptop, on a tablet, etc.). It can be helpful for a remote student to see the entire classroom, to see their peers, and the general environment in which the instruction is taking place. However, for direct instruction it is better to have the camera positioned more closely to the instructor so that facial expressions (even beneath a mask) and gestures can be better seen. The trade off is that the instructor may be more restricted in space unless you have a camera that automatically tracks and zooms and pans to 'stick' with the speaker (these exist, but carry a cost in money, implementation, and maintenance). Hearing You For in person students, this is a familiar dimension. In traditional classrooms, you calculate how to project your voice based on the proximity to students (often calibrated to those who are furthest away). In larger lecture halls or situations where students have certain auditory challenges, a microphone or other amplification device has probably already been in use. For remote students, this depends on microphone placement. In settings where an onboard laptop or tablet camera is being used, it usually means that accompanying integrated microphone is also being used. This requires the speaker to be in close and consistent proximity to the microphone in order to provide a steady listening experience for the audience. Ideally, you will create the option to separate the device that is sending live video (camera) from live audio (microphone). For example, if you have access to a secondary device (like a laptop, phone or tablet) you might join the meeting from that JUST to transmit audio, while using the primary device to transmit video. Seeing Your Visuals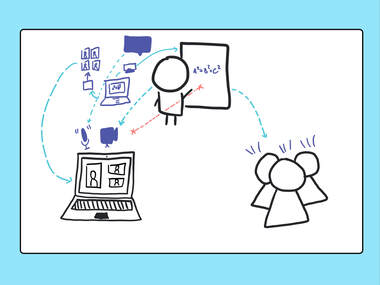 For in person students, they might have a good line of sight to a whiteboard, projector screen, or other kind of display within the teaching space. For remote students, it is possible to position the video camera so that it captures both you AND a whiteboard or screen. This is really hard to do well. The camera angle, the focus, and the video fidelity for most video conferencing solutions will not make it easy for students who are remote to see what is on the screen or board within the classroom. Ultimately it is better if you 1) use a digital whiteboard and/or 2) share your screen (i.e. presentation) through the meeting. This is best facilitated when your presentation device is separate from the device that is capturing the classroom video. You can join the meeting from your presentation device, share your screen to the meeting, and share your screen to the classroom projector/display. If you are presenting from an iPad and usually use Airplay to wireless project, you should join the meeting and share the screen to the meeting, but then project the other device (the one capturing the classroom video) to the classroom display. This is due to a current limitation in iPad only being able to share its screen to one destination at a time (either the Zoom OR Airplay). Instead of relying on a flip chart, whiteboard, or chalk board, using a digital whiteboard like Explain Everything can allow you to have that spontaneity and naturalness in your visualization of concepts. It's true that you lose some of the drama and theatrical effect of writing largely on the board, but at the same time, if positioned appropriately, you can find ways to not ever have your back to the students. I find that it is easier to sit and whiteboard (two free hands) as opposed to holding a laptop or tablet in one hand and then manipulating it with the other. Seeing and Hearing Your Students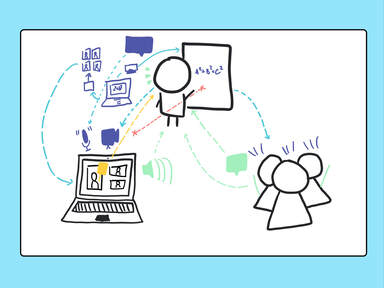 In person, it is easy to know when your students have a question. They may raise their hand. And you can often read from their body language if they are following, engaged, or disconnected. Even more so, they can sense and feel when you make eye contact and speak to them directly (even though you are actually speaking to the whole class). Simply put, if students are in the room with you the challenges of helping them be seen and be heard exist only in your own preferences and style of speaking.
For remote students, it's not always easy to see them, especially they are tiled in a gallery view and there are a lot of them. IF you do want to pause for questions or comments, you might ask students to put a thin, brightly colored piece of paper in front of their web camera to indicate a question. Or you might have them use the "Raise Hand" or "Q&A" or "Chat" to visually indicate that they have something to say, without introducing any audio interruption. For hearing your students, you might want to set a norm of having microphones muted until there are explicit pauses or moments for questions. From a technical perspective, you only want to have one microphone (audio in) and one set of speakers (audio out) within the space to avoid feedback (you've all probably heard that awful rising echoey screech before). Usually, this will be the same device (e.g., a laptop or tablet) but there are approaches that can work where separate devices are handling the audio in and out. For example, your camera device might also be the audio out device, but your microphone might be a phone or tablet that is closer to your speaking/teaching area. Like anything else, it takes a little experimentation within your space, with your style, and with the new routines you are willing to introduce to find a repeatable process but it is neither difficult nor inaccessible given the types of technologies we have today. In two previous posts, I shared about "quick and easy" whiteboard videos and "structured and optimized" whiteboard videos for higher education asynchronous instructional settings. Here, I'd like to share some moves to increase the production value for both the "quick and easy" approach as well as the "structured and optimized" approach. Here are the three areas that will be explored:
Workstation setup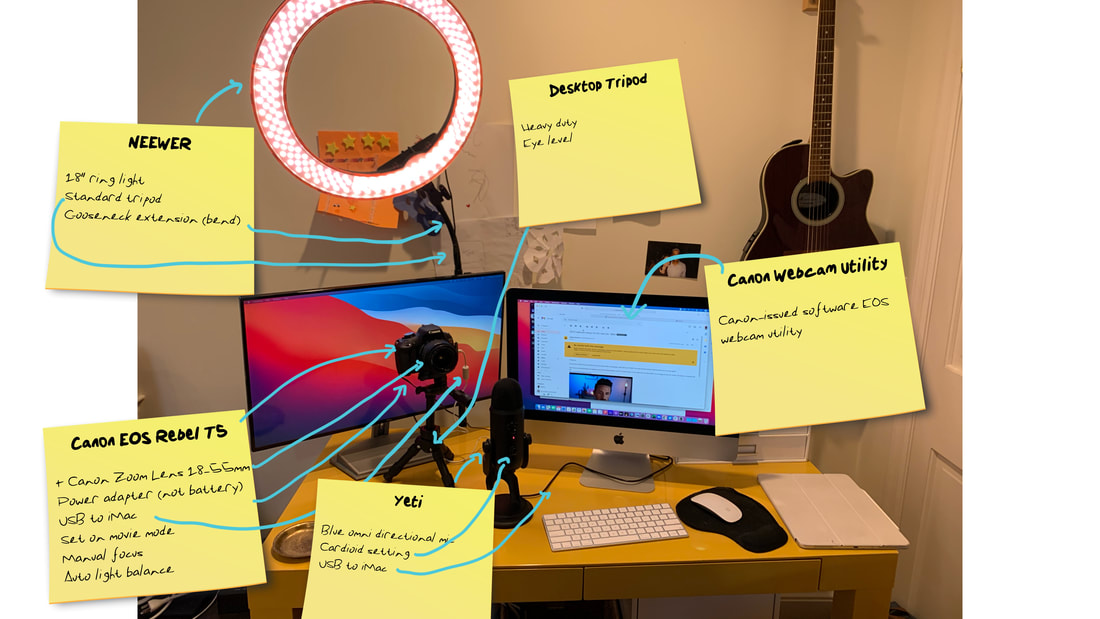 All of this gear might seem like way too much to want to deal with, but I am certain that small improvements in video and audio make a huge difference to audiences (live or via recording). I use Canon's EOS Webcam utility (PC or mac) to enable me to use a 3 year old SLR (Canon EOS Rebel T5 with a Canon Lens) as my webcam. I have it set to video mode, plugged in via USB to my computer, and plugged into a power source (my battery was not in great condition). It's sitting on a small desktop tripod. I also am using a Newer ring light (which was sent to me as a gift) on a regular tripod with a 'gooseneck' extension for the small bend. I am using a Yeti Blue USB microphone set to the 'Cardiod' setting. Here is what it's like before (desktop webcam, desktop microphone, no lighting). And here is what it looks like with the external camera and mic and lighting "Quick and Easy" Recording via ZoomIf I am making a quick and easy whiteboard video and I want to utilize my camera and microphone setup to the fullest, I'll do the following steps:
Here is what the linked video file would look like: Post-production with iMovieIf, as suggested in a previous post, you write out your script/talking points in full sentences, you can create two separate recordings. One will just be the whiteboard visual actions, and the other will be a 'talking head' video where you look at the camera and read from your script. In a video editing tool like iMovie, you can cut to and away from your main video as deemed effective. This requires of course both additional time for recording and editing (and some basic knowledge of timeline editing in a video editing tool). 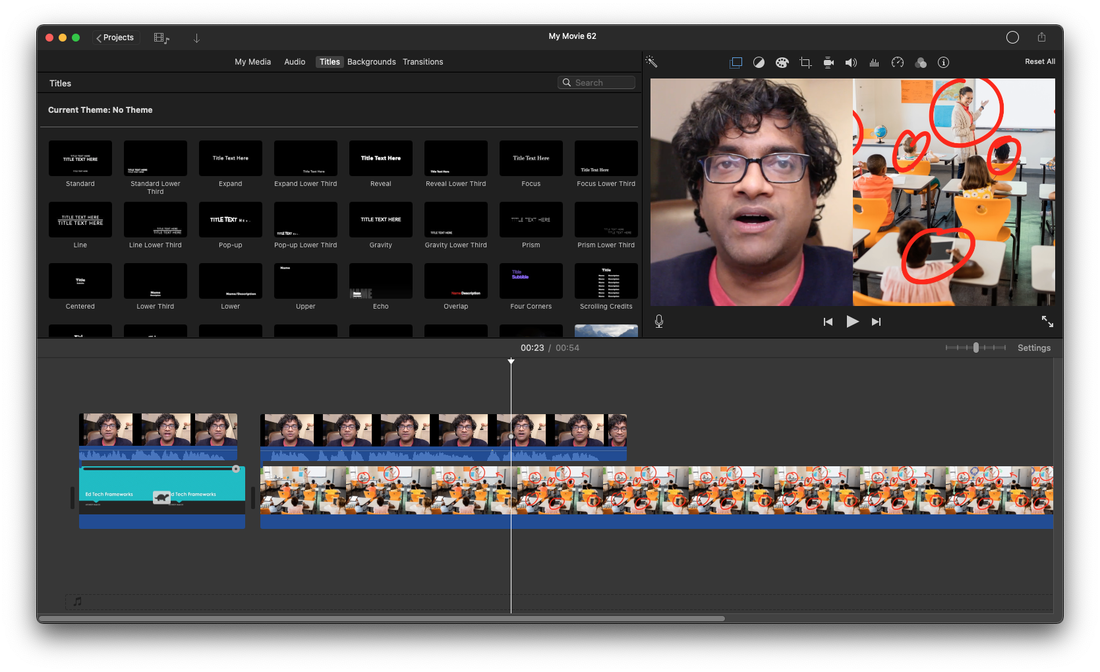 Below is a snippet of what the video output could look like. Free webinarJoin a free webinar on making videos for college and university instruction on Wednesday, 1/13 at 4PM ET.
In a previous post, I wrote about "quick & easy" steps for making whiteboard videos for college and university instruction using Explain Everything. Here are some additional steps that can provide more structure to the process and content while also optimizing the experience for your students. The areas to be discussed include:
Prepare a scriptI admit that I often like to ad lib and be spontaneous in my live instruction. And even with some of my whiteboard videos, I like to be informal and conversational. Sure, I will jot down some talking points on a post-it note or text file on my computer, but I don't necessarily always think about the precision of what might come out of my mouth. Often, however, when I listen back to what i have said there are way more pauses, "uhh"s, "um"s, and "you know"s than I think are helpful to the viewer/listener. Taking the additional time to write out a script accomplishes many things:
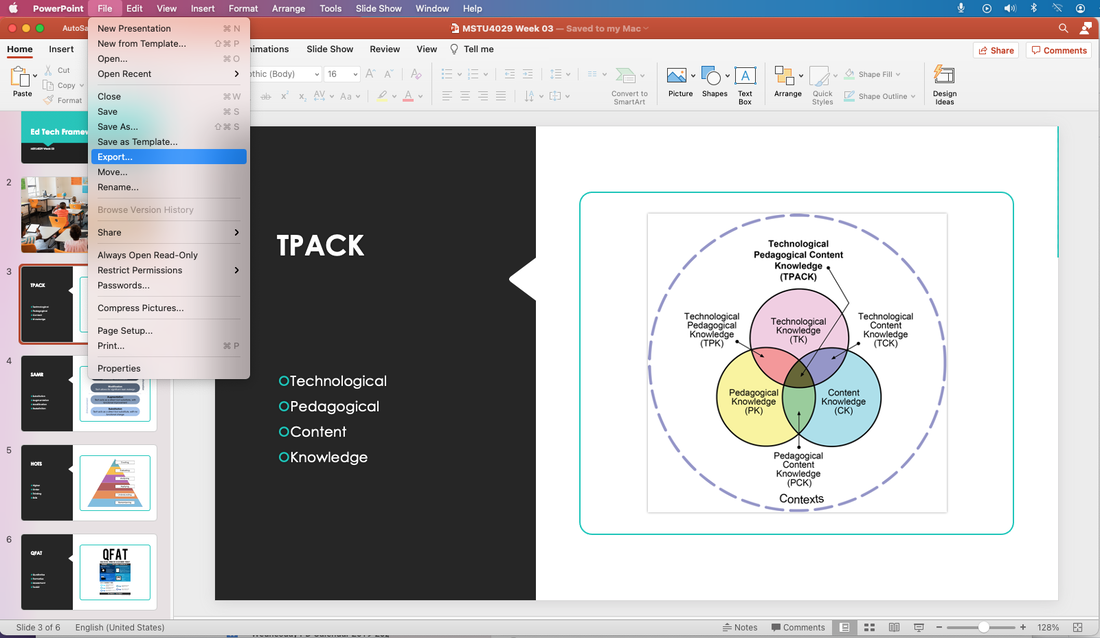
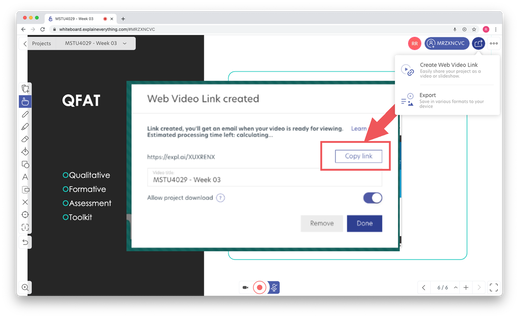
 Stage visual assetsI like to prepare slides in tools like Powerpoint and Keynote, but I do so in such a way that if I know that I'll be speaking to them (live or video), I won't try to jam all of the words and ideas onto the slide. Instead, I want what is visualized and what is spoken to be complimentary to each other. In addition to the backdrop slide, I like to prepare the things that I might want to add on to the stage as I am speaking. I could do this as staged builds within Powerpoint or Keynote, but I prefer to have some independence with the objects so I can move them around more naturally. I'll usually setup a folder that not only contains a PDF of my slides but also any additional artifacts (a PDF, an image, a Video, etc.) that I plan to add and make sure it is in a place I can access from Explain Everything (desktop folder, GDrive, Dropbox, etc.).  Record audio then visualsFirst, I'll create a project and import my backdrop slides as separate pages in Explain Everything. Then, using my script, I'll record the audio for each slide without worrying about any visuals or animations. I can really focus on my words and pacing. Next, I'll rewind and MUTE my microphone. This is where the Mix mode of Explain Everything becomes really powerful. I can add visualizations while listening to myself speak. I can also pause, add something to the canvas, and then resume recording visuals. This will make it seem like things are instantly appearing to the viewer. I'll add objects and annotations to each of the slides of my recording after first recording my talk track. There are a lot of timeline editing options, such as removing dead/quiet space at the start or end of a video that you can learn more about at Explain Everything's Help Center. 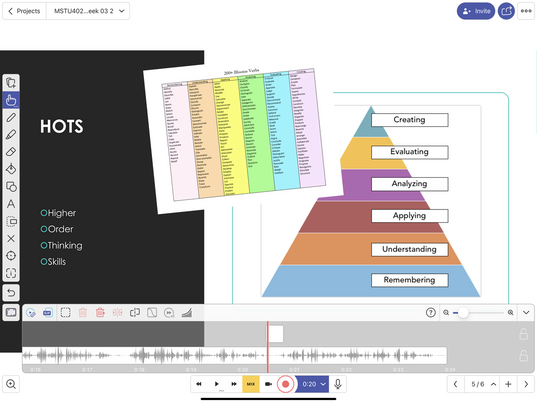 Export and publish videos in chunksIt is possible to quickly generate a shareable URL that will show all of your recorded slides in a single, stitched together video. However, it can be very helpful to your viewers to separate longer videos into chunks. It requires a few additional clicks on your part, but reduces the effort for all of your students (however many there may be). 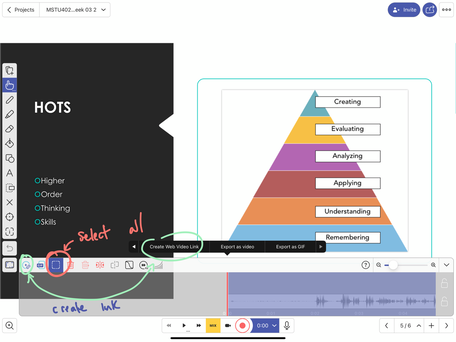 First, open up the timeline and rewind to the beginning. Then, press the Select area button and scrub to choose the entire timeline. Finally, choose the 'Web Video Link' button. It will generate a unique URL for just the video content of the selected area. This is the URL you can copy and paste to your Learning Management System. If your video has 5 sections, you'll have 5 URLS (here is where naming can be helpful). 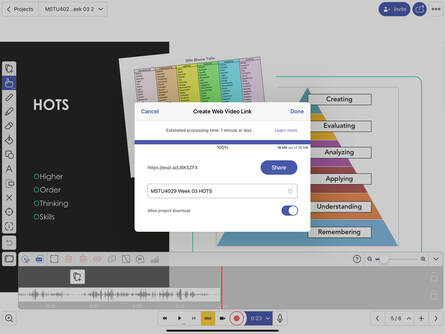 Below is what it looks like in my Canvas course page editor just before I'm ready to hit save, and this link will take you to the entire video stitched together. 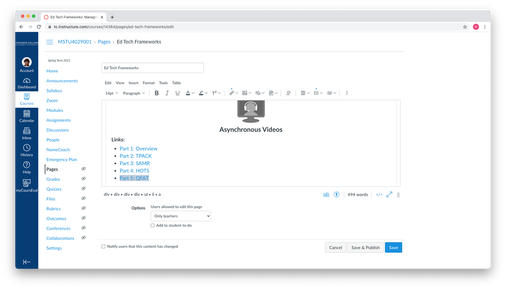 Free WebinarI'll be hosting a free webinar on this topic on Wednesday 1/13 at 4PM ET. Sign up below!
Here is a quick way to create a whiteboard instructional video using Explain Everything and content you already have for your college or university course. We'll go through three phases: Prepare, Produce, and Publish.
Prepare
First, I always like to write on a piece of scratch paper or a note pad the talking points I want to cover and then imagine how those might be staged across slides/views.
Then, using my preferred tool I will review/create/update my visual backdrop according to those notes. I will export/save the file in a place that I can readily access. Here I am using Microsoft's Powerpoint and am exporting the file as PDF to my desktop as PDFs preserve formatting best and talk more nicely to other applications. If you normally use staged builds and transitions in your presentations, you will need to think about what is important or how to export the builds so they show up as different PDF pages
Produce
First, I will create new project and import my PDF. I might quickly set up my colors and desired pen thicknesses. Then I press record and using my notes speak to each slide on by one. Here I am using the web version of Explain Everything.
Publish
When I am done recording, I select the Create Web Video option from the share menu and copy the link.
Finally, I head to my Learning Management System and find the page where I want my students to access the video. This is where I will paste the link. Here I am using Canvas' LMS.

The Outcome
Here is the video that resulted.
Free Webinar Weds 1/13 4:00PM ET
I'll be hosting a free webinar on Whiteboard Videos for Higher Ed Instruction on Wednesday, January 13 at 4PM ET. In addition to "Quick and Easy" creation, we'll also explore more structured and optimized videos as well as higher production options.
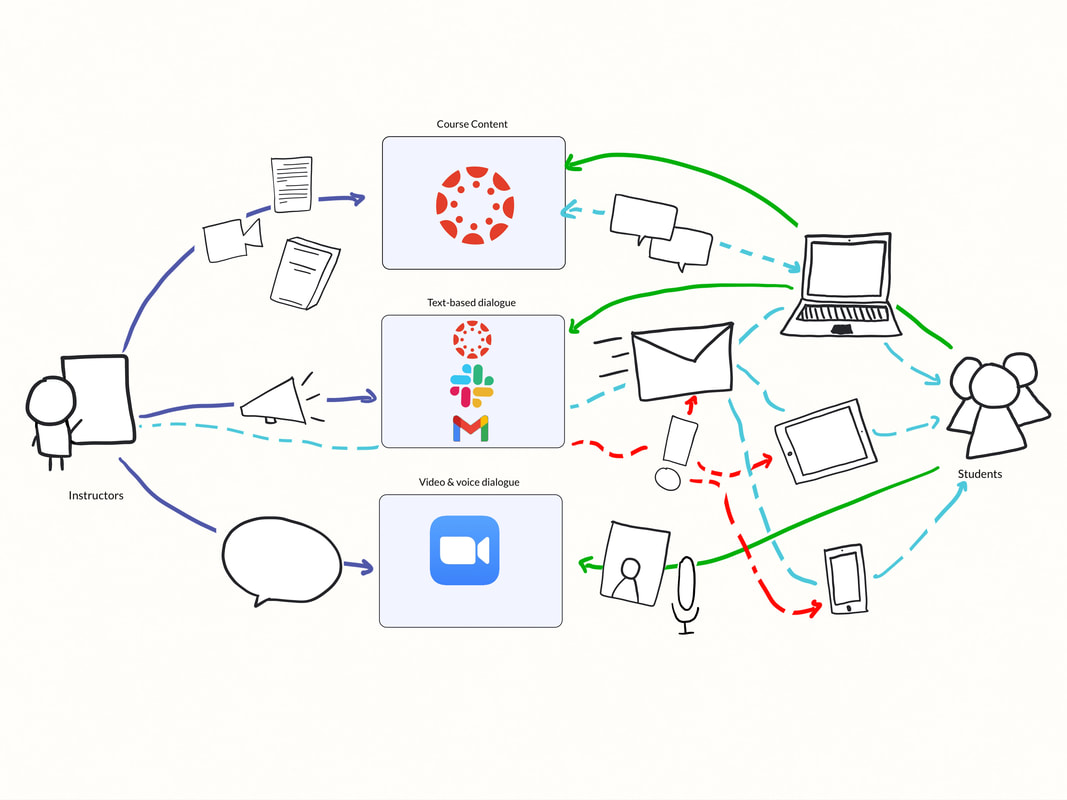 It can be a worthwhile exercise to put some time and consideration into how information will flow across the platforms and devices that students might be accessing for your college or university course. It will be essentially impossible to expect all students to have the same conditions (hardware, notification setups, etc.) but it is possible to describe the primary information flow as designed so that students can adjust as best as possible. Step 1: Identify the platforms used for Course Content, Text-Based Dialogue, and Video/Voice dialogue Step 2: Consider the types of information and experiences used in each of those platforms Step 3: Define the designed modes of accessing and contributing to each of those platforms for students Step 4: Acknowledge all of the additional possible layers and interconnections between those modes and systems. If you want to experiment with this exercise, here are some links that may help:
These are the instructions I am sending to students for my Spring 2021 course (via an LMS announcement):
Below are the screens of what students would see.
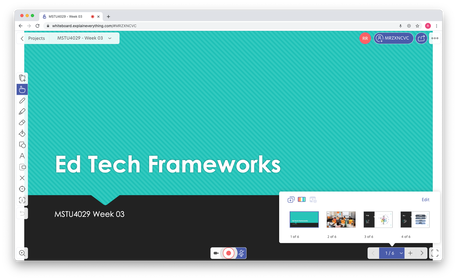
To get this all setup in advance, here is a whiteboard video showing what I needed to do as an instructor both in Explain Everything and in my learning management system (Canvas).
|
 RSS Feed
